FAQ
PDF 파일 다운로드 : < 여기를 클릭하세요 >
일반 광고 영상 : < 여기를 클릭하세요 >
기독교 광고 영상 : < 여기를 클릭하세요 >
영어캠프 최신 정보 : < 여기를 클릭하세요 >
1️⃣ 수업 방식
-
원어민 선생님과 1:1 화상 영어 수업
-
25분 / 50분 단위 선택 가능
-
25분 수업 → 체험 수업·어린이 집중 코칭에 적합
-
50분 수업 → 심화 학습·체계적 코스 진행에 효과적
-
2️⃣ 수업료 안내
-
AI로 인한 강사의 발음·실력을 정밀평가하며 강사의 능력에 따라 수업료가 차등 적용됩니다.
-
현재 최저가는 3,000원부터 시작하며, 레벨별 상한가는 제한됨.
| 선생님 레벨 | 25분 수업료 범위(원) | 50분 수업료 범위(원) |
|---|---|---|
| High Intermediate 1 | 1,000 ~ 2,031 | 2,000 ~ 4,061 |
| High Intermediate 2 | 1,500 ~ 3,046 | 3,000 ~ 6,092 |
| Proficient 1 | 2,500 ~ 5,077 | 5,000 ~ 10,153 |
| Proficient 2 | 4,000 ~ 8,122 | 8,000 ~ 16,245 |
| Advanced 1 | 5,000 ~ 10,153 | 10,000 ~ 20,306 |
| Advanced 2 | 6,000 ~ 12,184 | 12,000 ~ 24,367 |
3️⃣ 가격 경쟁력 비교 (25분 월 12회 기준)
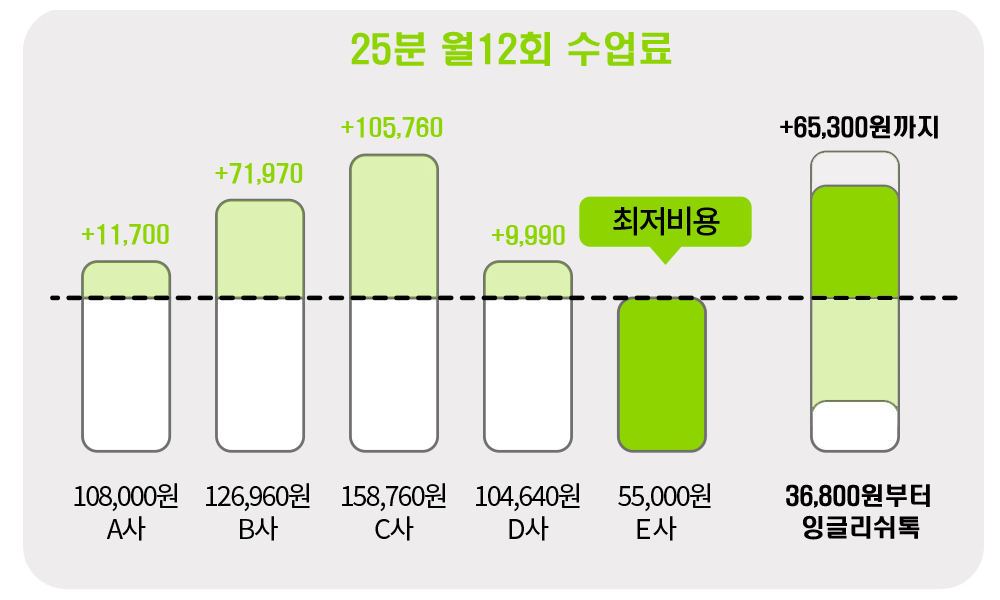
✅ EN‑TALK는 레벨별 맞춤 요금 + 36,800원부터 시작하는 합리적 가격!
✅ 현재 25분당 3천원정도로 업계 최저가 수준
(강사중 가장 낮은 레벨이라도 실생활·업무·자신의 전문 분야에서 자연스러운 의사소통이 가능한 수준)
EN‑TALK은 원어민과 1:1 화상 영어 수업을 통해 학습자의 목적과 수준에 맞는 맞춤형 커리큘럼으로 효율적인 실력 향상을 제공합니다.
학습자는 자신의 목표에 따라 영어 회화, 시험 대비, 비즈니스 영어 등 다양한 주제를 실시간으로 배우며 다음과 같은 효과를 얻을 수 있습니다.
✔️ 짧은 시간에도 집중적인 말하기 연습으로 자신감 향상
✔️ 문법·발음·쓰기 등 약점 보완 가능
✔️ 강사의 경력과 전문성을 바탕으로 한 고품질 수업 제공
✔️ 웹 브라우저만 있으면 언제 어디서든 학습 가능
이런 분들에게 특히 추천합니다:
-
어학연수·이민 준비자 → 현지 생활에 바로 적용 가능한 실전 회화 및 문화 이해 훈련
-
해외 선교 준비자 → 성경 기반 영어 커리큘럼과 원어민 소통 능력 강화
-
어린이 및 청소년 → 말하기 자신감과 탄탄한 기초 실력 형성
-
직장인 및 취업 준비생 → 비즈니스 영어·인터뷰 대비·실무 회화 강화
-
성인 학습자 → 영어 실력 유지와 꾸준한 실전 연습
📌 EN‑TALK은 단순한 영어 학습이 아니라,
구체적인 목표를 가진 학습자에게 실질적인 성과를 제공하는 맞춤형 학습 솔루션입니다.
EN-TALK 수업은 다음과 같은 절차로 간단하게 예약하고 참여하실 수 있습니다:
-
EN-TALK 로그인 페이지에 로그인합니다.
-
강사 목록에서 원하는 선생님을 선택한 후, 수업 예약 방식 중 하나를 선택합니다:
-
건별 예약(25분 / 50분 단위): 필요한 시간만큼 개별 수업을 예약할 수 있습니다.
-
정규 수업 예약: 기간(예: 2주, 4주 등)을 설정하여 정기적으로 반복되는 수업 일정을 예약할 수 있습니다.
-
-
강사 스케줄에 맞는 원하는 시간대를 선택해 수업을 예약합니다.
-
수업 시간에는 **웹 브라우저(Chrome 권장)**로 접속하여 실시간 화상 수업에 참여합니다.
📌 별도 프로그램 설치 없이도 수업 참여가 가능하지만,
예약 알림과 스케줄 관리를 보다 편리하게 이용하시려면 EN-TALK 전용 앱 설치를 추천드립니다.
🔔 EN-TALK 모바일 앱은 8월 중순부터 Google Play와 App Store에서 제공될 예정입니다.
모바일 환경에서도 쉽고 빠르게 수업 예약과 참여가 가능하며, 알림 기능도 지원됩니다.
EN-TALK은 다양한 기기에서 편리하게 이용하실 수 있습니다.
-
PC / 노트북 / 태블릿 / 스마트폰에서 웹 브라우저를 통해
수업 참여, 스케줄 확인 및 신청 등 대부분의 기능을 이용하실 수 있습니다. -
다만, 웹 브라우저 환경에서는 알림 기능에 제약이 있어 중요한 알림을 놓칠 수 있습니다.
👉 보다 편리한 이용을 원하신다면, EN-TALK 전용 앱 설치를 추천드립니다.
(앱은 8월 중순부터 Google Play와 App Store에서 제공될 예정)
💡 수업은 스마트폰, 태블릿, 노트북 등 어떤 기기에서도 전체 화면으로 참여가 가능합니다.
하지만 보다 집중도 높은 학습 환경을 위해
화면이 큰 기기(Pad 또는 PC)와 헤드셋 사용을 권장드립니다.
EN-TALK 강사는 단순히 영어를 잘하는 사람이 아닙니다.
대부분의 강사는 AI 기반 평가 시스템을 통해 아래의 영역에서 정밀한 평가를 거쳐 선발된 검증된 전문가입니다:
-
독해력
-
어휘 및 문법
-
말하기 (발음 포함)
-
쓰기
이들은 학습자의 영어 레벨과 목표에 맞춰 효과적으로 소통하고 수업을 설계할 수 있는 실력자이며,
실제 수업을 통해 그 역량을 직접 확인하실 수 있습니다.
🎯 강사 선택은 어떻게 하나요?
EN-TALK의 강사들은 각기 다른 열정, 경력, 전공, 수업 스타일, 커리큘럼을 보유하고 있습니다.
따라서 나에게 가장 잘 맞는 강사를 찾는 것이 학습 만족도에 매우 중요합니다.
**부담 없는 단기 수업**을 통해 여러 강사의 수업을 직접 경험해 보시고,
가장 편안하고 효과적으로 배울 수 있는 강사를 선택해 보세요.
이후 정규 수업으로 이어가면 학습의 즐거움과 실력 향상을 확실히 체감하실 수 있습니다.
💡 EN-TALK은 단순한 수업이 아닌,
학습자에게 딱 맞는 강사와의 만남을 통해 영어를 즐겁게 배우는 환경을 제공합니다.
EN-TALK은 고정 커리큘럼과 강사별 맞춤 커리큘럼을 함께 제공합니다.
🔹 고정 커리큘럼 확인 방법
-
PC 접속 시
-
모바일 및 앱 접속 시
각 커리큘럼을 클릭하면 해당 수업을 제공하는 강사 목록도 함께 확인할 수 있습니다.
🔸 강사별 맞춤 커리큘럼
EN-TALK의 강사들은 각자의 교육 경험과 수업 스타일을 반영해 다양한 커리큘럼을 직접 구성하고 있습니다.
-
강사 소개 페이지에서
전문 분야 / 수업 방식 / 개별 커리큘럼 등을 확인한 후
나에게 맞는 선생님을 선택해 주세요.
⏰ 수업 전 변경
-
수업 시작 60분 전까지 자유롭게 변경이 가능합니다.
-
가능하다면 하루 전까지 미리 요청해 주시면 더욱 감사하겠습니다.
🔔 갑작스럽게 일정 변경이 필요한 경우, 강사에게 메시지로 사전 협의를 부탁드립니다.
강사의 준비 시간을 배려해 주시는 마음이 더 좋은 수업으로 이어집니다.
💰 수업 후 환불
-
정상적인 수업 진행이 불가능했던 경우(예: 강사 미출석, 심각한 연결 문제 등)에만 환불가능
-
해당 강사 확인 후 결제 금액이 포인트로 환불되며, 해당 포인트는 다음 수업 결제 시 자동 사용됩니다.
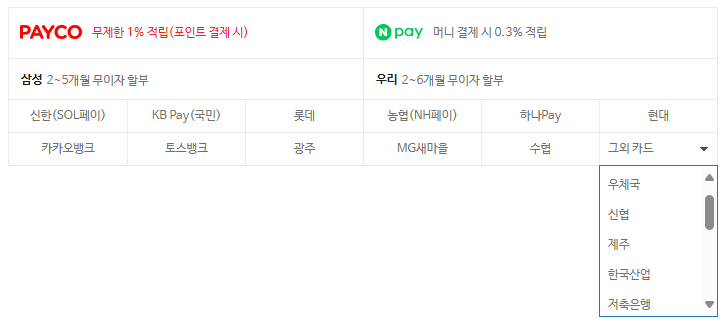
EN-TALK은 다양한 결제 수단을 지원합니다.
간편결제 (네이버페이 등)
PAYCO
계좌이체
-
신용/체크카드
📌 주의사항
카드 결제의 경우, 대부분의 카드사에서 3D 보안 인증 절차가 요구됩니다.
이 과정에서는 신분 확인, 추가 비밀번호 등록 등 번거로운 절차를 거쳐야 할 수 있습니다.
👉 따라서, 보다 빠르고 간편한 결제를 원하신다면 다음 방법을 추천드립니다:
-
네이버페이나 PAYCO를 통한 간편결제
-
뱅크페이 앱을 사용하는 계좌이체 선택
첫 결재후 인증 절차 없이 더 빠르게 결제하실 수 있습니다.
💳 포인트 안내
온라인 스토어 구매나 정상적인 수업이 진행되지 않아 환불 시 지급되는 포인트는 사용 기간 2년입니다.
이벤트·서비스 홍보용으로 제공되는 프로모션 포인트는 3개월 이내에 사용하셔야 하며, 미사용 시 자동 소멸됩니다.
모든 포인트는 현금으로 환불되지 않습니다.
💳 환불 안내
EN-TALK의 환불은 현재 관리자 직접 처리를 통해 이루어집니다.
아래의 환불 기준을 참고해 주세요.
📌 환불 기준
1️⃣ 결제 후 24시간 이내 환불 요청
-
수업을 전혀 수강하지 않은 경우
→ ✅ 전액 환불
2️⃣ 결제 후 7일 이내 환불 요청
-
수업이 진행되지 않은 당사 귀책 사유가 있거나
-
이에 준하는 합리적인 사유가 있는 경우
→ ✅ 전액 환불
3️⃣ 전체 수업의 1/3 미만을 수강한 경우
→ 🔁 결제 금액의 50% 환불
4️⃣ 위 조건에 해당하지 않는 경우
→ ❌ 환불 불가
⏳ 유의사항
-
환불 요청은 결제일로부터 3개월 이내에만 가능합니다.
기기의 성능 저하 또는 인터넷 연결 불안정으로 인해 영상 또는 음성이 끊기거나 지연될 수 있습니다.
아래 점검 항목을 따라 문제를 해결해 보세요.
✅ 점검 방법 안내
1. CPU/메모리 점검
-
Windows:
Ctrl + Shift + Esc→ 작업 관리자 → ‘성능’ 탭에서 CPU와 메모리 사용률 확인 -
Mac: Spotlight(⌘ + Space) → “활동 모니터” 검색 → CPU/메모리 탭 확인
✅ 사용률이 90% 이상일 경우, 다른 프로그램을 종료해 주세요.
2. 인터넷 연결 상태 확인
-
Speedtest.net 에 접속하여 인터넷 속도를 측정
권장 속도: 다운로드/업로드 최소 5Mbps 이상 -
Wi-Fi 사용 시, 라우터 가까이에서 수업 진행 또는 유선 연결 시도
3. 브라우저 점검
-
브라우저를 완전히 종료하고 다시 실행
-
Chrome 또는 Edge 권장, 다른 브라우저로도 접속 시도
-
브라우저 캐시 삭제 후 재시작
4. 영상 재생 테스트
-
YouTube에서 영상(예: https://youtube.com/shorts/uJ1ipt1shPQ?feature=share)을 재생해보세요.
영상이 멈추거나 느릴 경우, 네트워크 또는 기기 성능 문제일 수 있습니다.
1. 프로그램 다운로드 및 설치
아래 주소에서 자신의 PC에 맞는 Zoom 프로그램을 다운로드해 설치합니다:
🔗 https://zoom.us/download
- 내 컴퓨터의 시스템 종류(32비트 또는 64비트)를 확인한 후 알맞은 버전을 선택하세요.
- 최근에 출시된 컴퓨터는 대부분 64bit, 오래된 모델은 32bit입니다.
시스템 종류 확인 방법 (Windows 기준): 내컴퓨터 > 마우스 우클릭 > 속성 클릭 > 시스템 종류 또는 설정 > 시스템 > 정보 > 시스템 종류
2. Zoom 회원가입 및 로그인
- 설치한 Zoom 프로그램을 실행합니다.
- Google, Facebook, 또는 이메일 계정으로 회원가입 후 로그인합니다.
3. 수업 참여 방법
- 강사 또는 플랫폼에서 제공한 Zoom 링크를 클릭하거나
- Zoom 실행 후 "회의 참가" 버튼을 눌러 회의 ID 및 비밀번호를 입력하여 입장할 수 있습니다.
4. 수업 중 기본 설정
- 입장 시 오디오 연결 허용, 카메라 켜기/끄기 선택이 가능합니다.
- 안정적인 수업을 위해 이어폰/헤드셋 사용을 권장합니다.
5. 오류 발생 시
접속이 되지 않거나 소리가 들리지 않을 경우 다음을 확인해 보세요:
- 인터넷 연결 상태
- 오디오 장치 설정 (Zoom 내 마이크/스피커 테스트 기능 사용)
- Zoom 최신 버전 업데이트 여부
1. Google Meet 접속 방법
Google Meet은 별도 프로그램 설치 없이 웹 브라우저에서 바로 사용할 수 있습니다.
📍 접속 주소: https://meet.google.com
- Chrome, Edge, Safari 등 최신 웹 브라우저에서 접속해 주세요.
- Google 계정 로그인이 없어도 참여가 가능합니다.
- 로그인하지 않은 경우에도 Meet 링크만 있다면, 이름을 입력한 뒤 참여 요청을 통해 입장할 수 있습니다.
2. 수업 참여 방법
- 강사가 제공한 Meet 링크가 연결된 컴퓨터 아이콘
 을 클릭하면 바로 입장 화면으로 이동됩니다.
 - 로그인 상태일 경우 바로 입장 가능하며, 로그인하지 않은 경우에는 **이름을 입력 후 "참여 요청"**을 보내면 강사가 수락하면 입장됩니다.
3. 모바일 앱 설치 (스마트폰/태블릿)
- 모바일에서는 Google Meet 앱 설치가 필요합니다.
- Android: Google Play에서 "Google Meet" 검색
- iPhone: App Store에서 "Google Meet" 검색
4. 수업 중 기본 설정
- 입장 전 마이크와 카메라 상태를 확인하고 켜거나 끌 수 있습니다.
- 원활한 수업 진행을 위해 이어폰이나 헤드셋 사용을 권장합니다.
5. 문제가 발생할 경우 확인할 사항
- 인터넷 연결 상태
- 브라우저의 카메라/마이크 권한 허용 여부
- 다른 앱이 카메라/마이크를 사용 중인지 확인 (예: Zoom, Skype 등)
원격 지원을 요청하고 싶으신가요? 아래 절차에 따라 진행해 주세요.
Windows, macOS, Android, iOS 등 모든 운영체제를 지원하며, 일부 제한 사항은 아래에 안내되어 있습니다.
✅ 1단계: 관리자와 먼저 상담하세요
🔹 Chat 페이지를 통해 먼저 관리자에게 문제를 설명하고, 원격 지원이 가능한지 확인해 주세요.
🔹 지원 가능하다는 안내를 받은 후, 아래 절차를 따라주세요.
✅ 2단계: AnyDesk 다운로드 및 실행
기기에 맞는 버전을 아래 링크에서 다운로드하세요:
-
💻 Windows / macOS / Linux
한국어 다운로드 페이지
English Download Page -
📱 Android
→ Google Play에서 “AnyDesk” 검색 후 설치 -
🍎 iOS (iPhone / iPad)
→ App Store에서 “AnyDesk” 검색 후 설치
⚠️ 주의: iOS는 원격 제어가 불가능하며, 화면 보기만 지원됩니다.
✅ 3단계: 접속 코드(ID) 공유
AnyDesk 실행 시 **10자리 숫자 주소(ID)**가 나타납니다.
👉 이 숫자를 복사하여 Chat 페이지를 통해 관리자에게 전달해 주세요.